This tutorial will show you how to configure an Arduino board in order to connect and send some data to Servitly and display them within a chart. To make this tutorial more simple the sent data will be generated randomly, but depending on your skills the value can be read from a temperature sensor connected to the board.
1. Prerequisites
-
A configured Servitly account.
-
1 x Arduino MKR1000 WiFi board.
-
An accessible WiFi connection.
-
1 x USB to Micro-USB cable.
-
Arduino IDE to program the board.
-
Basic Arduino programming skills
2. Setup Activities
-
If not already done follow the Basic Configuration tutorial in order to configure a new Thing within your Servitly account.
-
Download and install the Arduino IDE from https://www.arduino.cc/en/Main/Software.
-
Connect your board to the PC using the cable.
-
Open Arduino IDE.
-
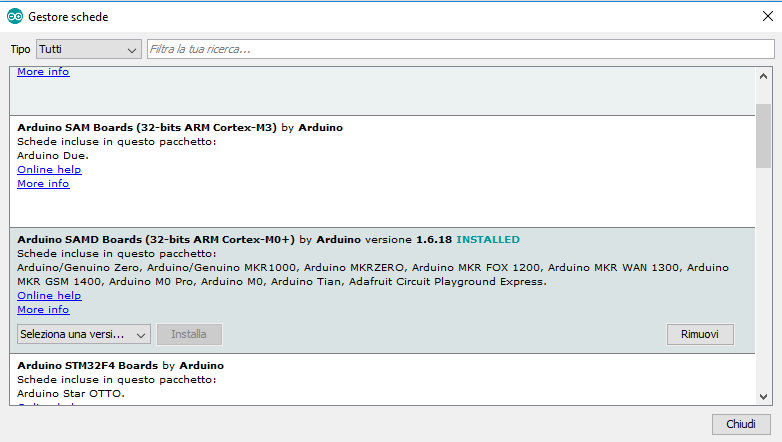
Add the Arduino MKR1000 compatibility installing Arduino SAMD Boards (32 bits ARM Cortex M0+) by Arduino from Tools → Board → Boards Manager…, and then select the Arduino/Genuino MKR1000 board.

-
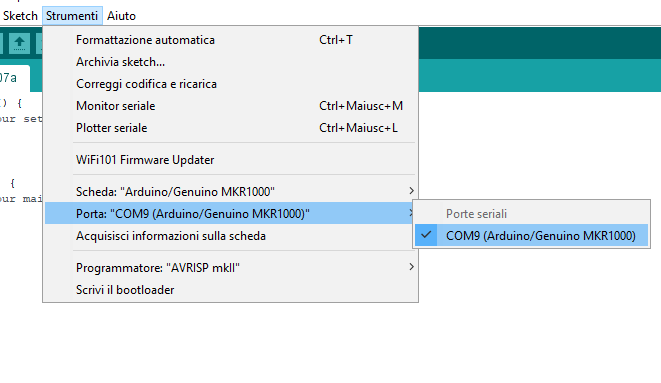
Select the serial port from Tools → Port.

-
Download the Wifi101 library from https://github.com/arduino-libraries/WiFi101 and install it from Sketch → #include library → Add .ZIP library.
-
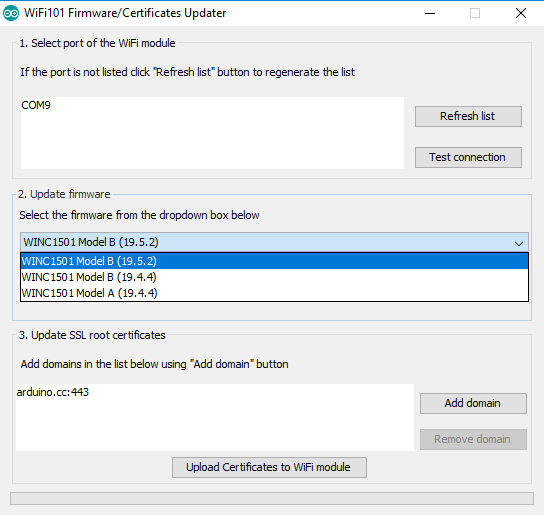
Update the firmware version; at first, you need to upload on your board the FirmwareUpdater sketch that you can find in the Wifi101 library examples sketches. Then you can go on Tools → Wifi101 Firmware Updater and select the Model A or Model B update watching the last letter of the serial number on the first line of the WiFi module label.

-
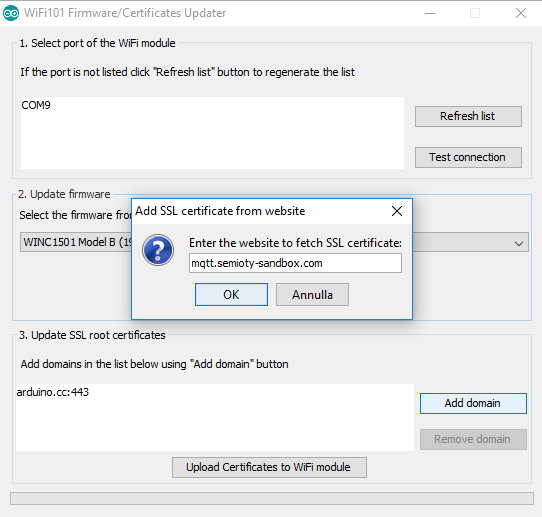
Upload the Servitly certificates on the WiFi module opening the same window used to update the firmware. Click on Add domain, write mqtt.servitly-sandbox.com or mqtt.servitly.com, and then Upload certificates on WiFi module.

3. Create the Client
Now we have to write the sketch thanks to which Arduino becomes an MQTT client and sends data to Servitly.
-
Download and install the PubSubClient library from https://github.com/knolleary/pubsubclient, and install it. This library allows creating the MQTT client.
-
Create the sketch which connects Arduino to Servitly and publishes messages. Here there’s an example in which Arduino, used as a generic Thing, publishes a measure every 2 seconds.
Note: remember to replace WiFi credentials and Servitly credentials with yours.
#include <WiFi101.h>
#include <PubSubClient.h>

//WiFi credentials
char ssid[] = "myNetworkSSID";
char password[] = "myNetworkPassword";

//broker credentials
char broker[] = "mqtt.servitly-sandbox.com";
char clientID[] = "clientID";
char user[] = "myUsername";
char pass[] = "myPassword";
char topic[] = "myTopic";

//initialize client
WiFiSSLClient wifiClient;
PubSubClient mqttClient(wifiClient);
int status = WL_IDLE_STATUS;

String msg;
char message[300];
long randTemperature;

void connect(){
  //connecting to WiFi
  while(status != WL_CONNECTED)
  {
    status = WiFi.begin(ssid, password);
    delay(100);
  }
  //connecting to Servitly
  mqttClient.setServer(broker, 8883);
  while(!mqttClient.connect(clientID, user, pass)){
    delay(100);
  }
}

void setup() {
  connect();  //connecting
  randomSeed(analogRead(0));
}

void loop() {
    //sends a measure every 2 seconds
    mqttClient.loop();
    if(!mqttClient.connected())
      connect();
    randTemperature = random(40);
    msg = msg + "{\"data\":{\"measure1\":" + randTemperature + "}}";
    msg.toCharArray(message, 300);
    mqttClient.publish(topic, message); //publish the message
    msg = "";
    delay(2000);
}
-
Open the Thing dashboard.
-
Upload the sketch on your Arduino board.
-
The line chart should be updated in a few seconds with the published temperature values.

Comments
0 comments
Please sign in to leave a comment.