
This tutorial will show you step-by-step how to test the connection of your devices to Servitly using the MQTT standard protocol.
To publish data through the MQTT protocol you can download the Eclipse PAHO library, which is available in several programming languages, check out the download page for more details.
You can download here the source code (Java) of the sample project used by this tutorial.
Account creation
-
Create a new account on https://lab.servitly-sandbox.com/
- When done, login and select the "My Home" location.
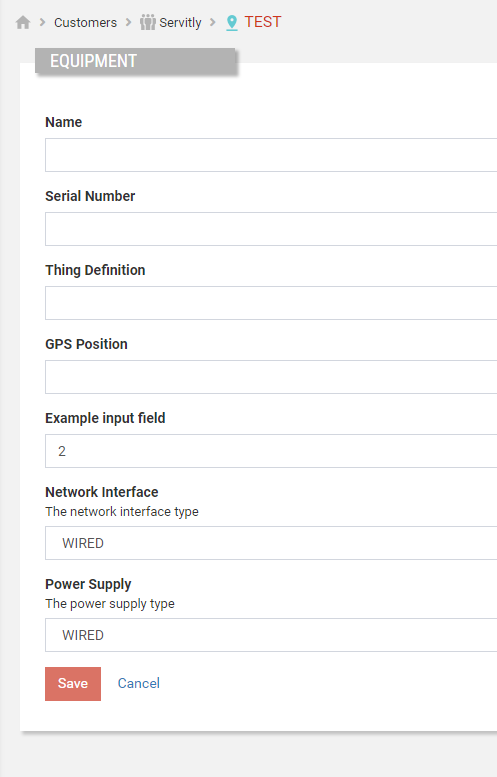
- Press the (+) button to create new Equipment:
-
Name: as desired, it’s the mnemonic name of the equipment you are creating.
-
Serial Number: as desired, it’s the equipment’s unique serial number (e.g. SN-12345).
-
Thing Definition: select Generic-Device, it’s the default equipment definition for testing that includes a predefined set of metrics, commands, configuration-parameters, and alerts definitions.
-
GPS Position: optional, by default it’s inherited from the location if specified.
MQTT Connector Configuration
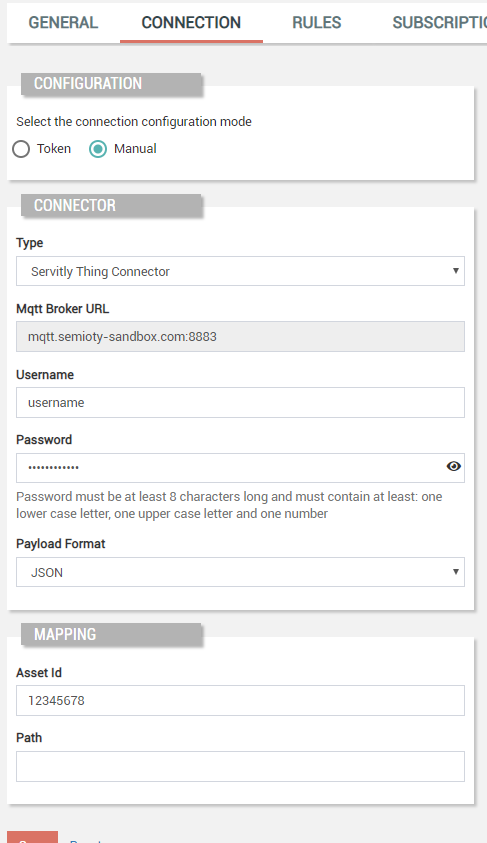
Once saved, go to the equipment Connection tab to configure how the Equipment will connect to the cloud. Provide the following information:
-
Type: Servitly Thing Connector.
-
MQTT Broker URL: mqtt.servitly-sandbox.com:8883.
-
Username: as desired by you, it is the unique username identifying the MQTT connection.
It’s the root part of the MQTT topics <USERNAME>/<ASSET_ID>/<METRIC_PATH>. -
Password: at least 8 characters long with at least one lower case letter, one upper case letter, and one number.
-
Payload Format: JSON.
-
Asset Id: the equipment identifier, it will be used as the MQTT sub-topic (usually it is equivalent to the Serial Number or the MAC address of the gateway).
-
Path: the optional path which can be used to manage multiple devices mapped under the same gateway.
Now you are ready to open an MQTT connection and start sending data to Servitly.
MQTT Client
In order to publish data through the MQTT channel, the following information is needed:
-
MQTT Broker URL: the MQTT broker connection URL.
-
Username: the username used to open the MQTT connection.
-
Password: the username password authenticating the MQTT connection.
-
Asset Id: the device identifier used within the publishing topic.
-
Metric Path: the path mapping the metrics you want to publish.
If you are using the "Generic Device" Thing Definition, you must use "measures".
For more details about how to configure the connection properties, enter the device dashboard page and click on the Edit button (top right), and then enter the Connection tab.
Please note that the publishing topic must have this structure <USERNAME>/<ASSET-ID>/<METRIC_PATH>, for this test you can use measures as the metric path.
Here is the PublishSample Java class, that connects to the Servitly MQTT broker and publishes a message by using the PAHO MqttClient synchronous API.
Remember to replace the variables (<***>) with your connection properties.
package com.servitly.samples.mqtt;

import java.util.Random;

import org.eclipse.paho.client.mqttv3.MqttClient;
import org.eclipse.paho.client.mqttv3.MqttConnectOptions;
import org.eclipse.paho.client.mqttv3.MqttException;
import org.eclipse.paho.client.mqttv3.MqttMessage;

import com.fasterxml.jackson.databind.node.JsonNodeFactory;
import com.fasterxml.jackson.databind.node.ObjectNode;

/**
 * This sample class uses the PAHO client to publish a message to the MQTT broker.
 */
public class PublishSample {

   private static final String BROKER_URL = "ssl://mqtt.servitly-sandbox.com:8883";

   private static final String USERNAME = "<USERNAME>";
   private static final String PASSWORD = "<PASSWORD>";
   private static final String ASSET_ID = "<ASSET_ID>";

   private static final String METRIC_PATH = "measures";

   public static void main(String[] args) {
     try {

       // create the Servitly payload
       ObjectNode payload = JsonNodeFactory.instance.objectNode();
       payload.put("ts", System.currentTimeMillis());
       ObjectNode data = JsonNodeFactory.instance.objectNode();
       Random random = new Random();
       data.put("measure1", 42 + random.nextInt(10));
       data.put("measure2", 24 + random.nextInt(10));
       payload.set("data", data);

       // create the MQTT Client
       MqttClient mqttClient = new MqttClient(BROKER_URL, USERNAME + "_PUB");
       MqttConnectOptions connOpts = new MqttConnectOptions();
       connOpts.setCleanSession(true);
       connOpts.setUserName(USERNAME);
       connOpts.setPassword(PASSWORD.toCharArray());

       // open MQTT connection
       System.out.println("Connecting to MQTT broker: " + BROKER_URL);
       mqttClient.connect(connOpts);
       System.out.println("Connected");

       // publish message
       String topic = String.format("%s/%s/%s", USERNAME, ASSET_ID, METRIC_PATH);
       System.out.println("==> Publishing message to " + topic);
       System.out.println(payload.toPrettyString());
       MqttMessage message = new MqttMessage(payload.toString().getBytes());
       message.setQos(1);
       mqttClient.publish(topic, message);
       System.out.println("Message published");

       // disconnect client
       mqttClient.disconnect();
       mqttClient.close();
       System.out.println("Client disconnected");
    } catch (MqttException me) {
       System.out.println("Reason: " + me.getReasonCode());
       System.out.println("Message: " + me.getMessage());
       System.out.println("Cause: " + me.getCause());
       me.printStackTrace();
    }
  }
}
Let’s see how it works.
MQTT connection parameters
private static final String BROKER_URL = "ssl://mqtt.servitly-sandbox.com:8883";

// fields to replace
private static final String USERNAME = "<USERNAME>";
private static final String PASSWORD = "<PASSWORD>";
private static final String ASSET_ID = "<ASSET_ID>";
Here, we are defining the parameters needed for the connection, all of them have been configured during the product registration within Servitly.
MQTT connection certificate
All the Servitly connection certificates are secured over SSL, for more details about certificates refer to the SSL Certificates article.
Create the MQTT message payload
ObjectNode payload = JsonNodeFactory.instance.objectNode();
payload.put("ts", System.currentTimeMillis());
ObjectNode data = JsonNodeFactory.instance.objectNode();
Random random = new Random();
data.put("measure1", 42 + random.nextInt(10));
data.put("measure2", 24 + random.nextInt(10));
payload.set("data", data);
Here, we are preparing the MQTT payload that contains the measures being sent to Servitly. A generic payload has the following format:
{"ts": 1605179226000,
 "data":{
    "measure1": 42,
    "measure2": 24
 }
}
Publish the MQTT message
Here, we are creating the MQTT client that will connect to Servitly, and send the message that we have previously created.
// create the MQTT Client
MqttClient mqttClient = new MqttClient(BROKER_URL, USERNAME + "_PUB");
MqttConnectOptions connOpts = new MqttConnectOptions();
connOpts.setCleanSession(true);
connOpts.setUserName(USERNAME);
connOpts.setPassword(PASSWORD.toCharArray());

// open MQTT connection
System.out.println("Connecting to MQTT broker: " + BROKER_URL);
mqttClient.connect(connOpts);
System.out.println("Connected");

// publish message
String topic = String.format("%s/%s/%s", USERNAME, ASSET_ID, METRIC_PATH);
System.out.println("==> Publishing message to " + topic);
System.out.println(payload.toPrettyString());
MqttMessage message = new MqttMessage(payload.toString().getBytes());
message.setQos(1);
mqttClient.publish(topic, message);
System.out.println("Message published");
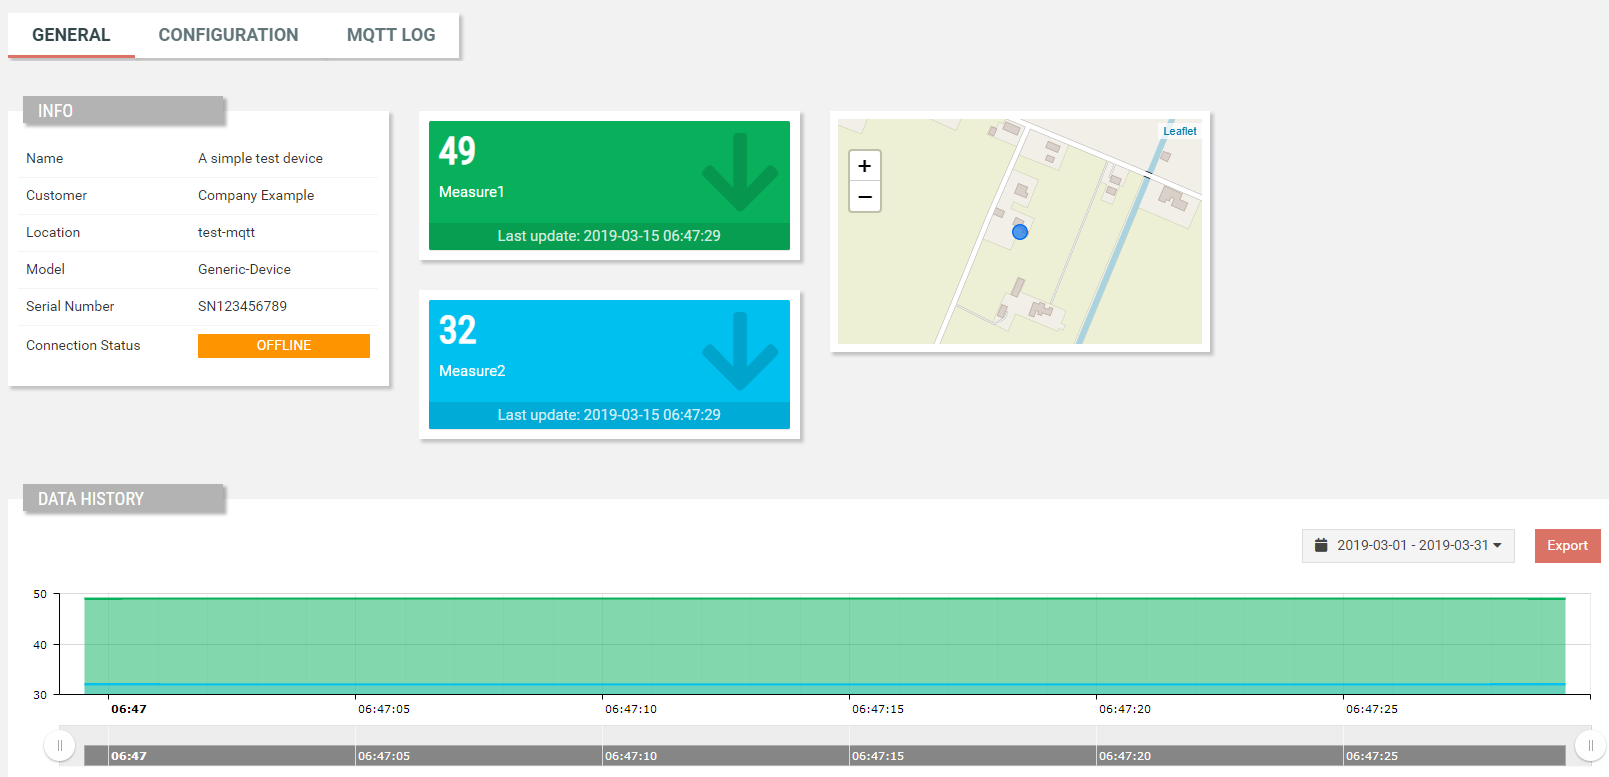
If everything works correctly, the result will be the Connection Status changed to ONLINE, and then a new measure is received.
Dealing with configuration parameters
The Generic-Device thing-definition exposes two metrics and a configuration-parameter:
|
METRIC |
MAPPING PATH |
MAPPING NAME |
|
Measure 1 |
measures |
measure1 |
|
Measure 2 |
measures |
measure2 |
|
Parameter 1 |
measures |
parameter1 |
Parameter1 can be updated directly within the dashboard, using the corresponding configuration-parameter in the Overview tab.
To receive data from Servitly for the Parameter 1 parameter, the MQTT client has to subscribe to the following topic:
<USERNAME>/<ASSET-ID>/command
Within the Java sample, you can find the SubscribeSample class, that once running remain active for 20 seconds, while on MQTT messages that are logged to the console. Here is the source code fragment responsible to listening on topics.
mqttClient.subscribe(topic, new IMqttMessageListener() {

    @Override
    public void messageArrived(String topic, MqttMessage message) throws Exception {
        JsonNode payload = JSON_MAPPER.readTree(message.getPayload());
        System.out.println("<== Incoming message from " + topic);
        System.out.println(payload.toPrettyString());
    }

});
Technical restrictions
-
The communication between the gateway and Servitly is TCP/IP based and encrypted with TLS 1.2.
-
The MQTT broker is exposed on the 8883 port, to open the connection this information is mandatory:
-
username and password: credentials defined within the Connection tab of the equipment registered within Servitly.
-
asset-id: the ID of the asset opening the connection, usually the serial number, or the MAC address can be used.
-
-
The MQTT topics must always start with the <USERNAME>/<ASSET_ID>/ path.
-
The MQTT topics must always end with the metric mapping path.
-
The Servitly Lab tenant allows 200 measures per hour per equipment, the measures exceeding such a limit will be discarded until the end of the hour.
-
The certificates of Servitly are periodically updated (see the SSL Certificates article).
Comments
0 comments
Please sign in to leave a comment.