This tutorial will show you how to configure a Raspberry Pi in order to run a Java client program able to connect and send some data to Servitly and display them within a chart.
To make this exercise easier, the data sent will be randomly generated, but depending on your capabilities the value can be read from a temperature sensor connected to the board.
1. Prerequisites
-
A configured Servitly account
-
1 x Raspberry Pi with SSH enabled.
-
1 x USB to Micro-USB cable.
-
SSH client, for instance, Putty.
-
Eclipse platform or similar for Java programming.
-
Basic Java programming skills.
-
Familiarity with Linux OS.
2. Setup activities
-
If not already done, follow the Get started with MQTT tutorial in order to configure a new Thing within your DPS.
-
Turn On the Raspberry Pi and test the connection to the local Wi-Fi or Ethernet LAN.
-
Ensure to be able to access the Raspberry Pi through the SSH client.
-
Ensure to have a Java SDK 1.8 installed.
3. Create the client
Before switching on a Raspberry Pi you need to create a client program able to connect to and send data to Servitly.
For this example, the Java version of the Paho MQTT client has to be used, but the MQTT client is also available for other languages (C, C++, C#, Python, etc.).
-
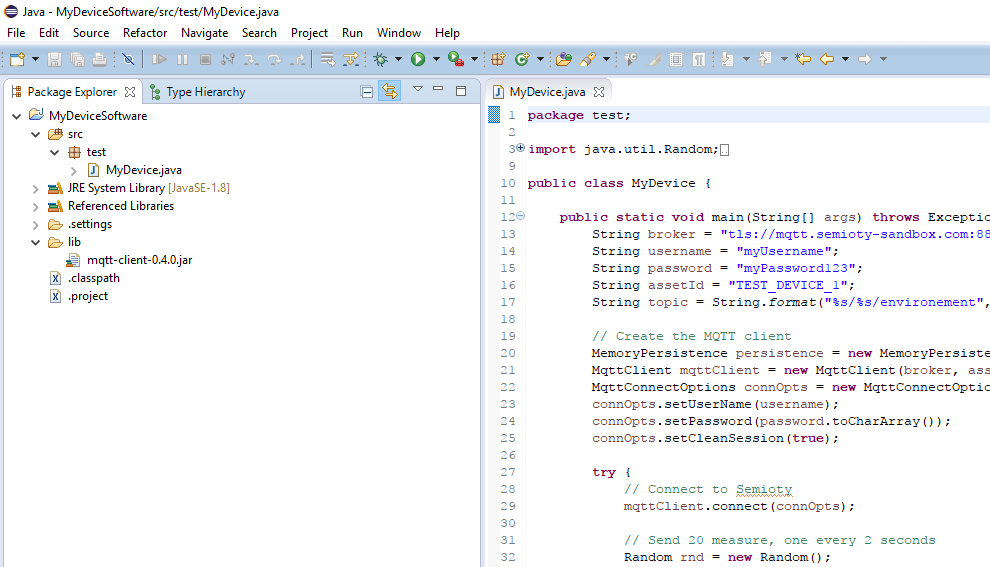
Within Eclipse create a new Java project named MyDeviceSoftware, use Java SDK 1.8
-
Download the MQTT client Java version mqtt-client-0.4.0.jar
-
Copy the mqtt-client-0.4.0.jar to the Java project folder.
-
Add the mqtt-client-0.4.0.jar to the project class path (right-click on the file → Build Path → Add to Build Path).

-
Create a new Java class test.MyDevice and copy the following code. Remember to update the code variables: username, password, assetId according to the values specified in the Location and Thing Mapping tabs.
package test;

import java.util.Random;

import org.eclipse.paho.client.mqttv3.MqttClient;
import org.eclipse.paho.client.mqttv3.MqttConnectOptions;
import org.eclipse.paho.client.mqttv3.MqttMessage;
import org.eclipse.paho.client.mqttv3.persist.MemoryPersistence;

public class MyDevice {

    public static void main(String[] args) throws Exception {

        String username = "myUsername";
        String password = "myPassword123";
        String assetId = "TEST_DEVICE_1";

        String broker = "ssl://mqtt.servitly-sandbox.com:8883";
        String topic = String.format("%s/%s/environment", username, assetId);

        // Create the MQTT client
        MemoryPersistence persistence = new MemoryPersistence();
        MqttClient mqttClient = new MqttClient(broker, assetId, persistence);
        MqttConnectOptions connOpts = new MqttConnectOptions();
        connOpts.setUserName(username);
        connOpts.setPassword(password.toCharArray());
        connOpts.setCleanSession(true);

        try {
            // Connect to Servitly
            mqttClient.connect(connOpts);
            System.out.println("Client connected");

            // Send 20 measure, one every 2 seconds
            Random rnd = new Random();
            for (int i = 0; i < 20; i++) {
                long ts = System.currentTimeMillis();
                String payload = "{\"ts\":%s, \"data\":{\"temperature\":%s}}";
                payload = String.format(payload, ts, rnd.nextInt(50));
                mqttClient.publish(topic, new MqttMessage(payload.getBytes()));
                System.out.println("Published measure: " + payload);
                Thread.sleep(2000);
            }
        } catch (Exception e) {
            e.printStackTrace();
        } finally {
            // Disconnect from Servitly
            mqttClient.disconnect();
        }
    }
}
-
Open the Thing dashboard.
-
Run the Java class (right-click on the class code → Run As → Java Application).
-
The line chart should be updated in a few seconds with the published temperature values.
4. Run on Raspberry Pi
Once the client program is running well, you can deploy and run it on a Raspberry Pi.
-
Turn on the Raspberry Pi, and access via the SSH client. See the Remote Access guide for more details.
-
Create a folder where to place the client program and resources.
mkdir MyDeviceSoftware
cd MyDeviceSoftware
touch start.sh
sudo chmod 777 start.sh
mkdir lib
-
Export the Java project as a single Jar file, on the src folder right-click to Export… → Java / Jar File → Export generated class files and resources → Finish.
-
Copy all the Jars (MyDeviceSoftware.jar and PAHO client jars) to the lib folder.
-
Edit the start.sh file with the following content. See the Text Editors guide for more details about how to edit file content.
#!/bin/sh
java -Xmx128m -cp "lib/*" test.MyDevice
-
Run the program with the following instruction
./start.sh
-
The dashboard should be updated with the published values, and the console should print out the program system outs.
-
In case the program must be executed on Raspberry Pi, see the RC Local documentation in order to configure the startup instructions.
5. Working with real data
This tutorial has shown you how to run a Java program to a Raspberry and send some generated data to Servitly.
In case a real sensor or the Thing controller (PLC) is connected to the Raspberry Pi, you can use the PI4J java library, which provides an easy way to read and write the GPIO pins present on the board.

Comments
0 comments
Please sign in to leave a comment.